Are you seeking to unlock the full potential of your Raspberry Pi, no matter where you are in the world? The key to seamless, secure, and remote access lies in understanding and implementing Secure Shell (SSH) a powerful tool that transforms your small computer into a versatile and accessible device.
The world of Raspberry Pi is vast and versatile, offering a playground for hobbyists, tech enthusiasts, and professionals alike. From home automation projects to sophisticated server setups, the possibilities are seemingly endless. However, the true power of a Raspberry Pi is often untapped if you're limited to accessing it only when you're physically present. This is where SSH enters the picture, offering a secure gateway to your device, regardless of your location.
The process of enabling and utilizing SSH might appear daunting at first, especially for those new to the world of Linux and networking. But fear not. It's a skill that can be acquired, a process that becomes easier with each step you take. There are numerous methods and tools at your disposal, ranging from simple command-line instructions to sophisticated network configurations. The purpose of this article is to provide you with a clear path to set up remote access, enabling you to leverage the full capabilities of your Raspberry Pi, making it an integral part of your digital life.
Before you begin, there are a few things you'll need. First and foremost, you'll require a Raspberry Pi, preferably one running the latest version of Raspberry Pi OS. A stable internet connection for your Raspberry Pi is also essential. Youll need to know your Raspberry Pis local IP address, which you can often find by checking your router's connected devices list. Finally, a basic understanding of the command line interface (CLI) is helpful, though not strictly required, as many graphical tools can simplify the process.
When it comes to accessing your Raspberry Pi remotely, security should always be a primary concern. SSH, by its nature, offers a robust layer of encryption, ensuring that your data remains protected during transit. However, there are additional measures you can take to enhance security, such as changing the default SSH port, using strong passwords or, better yet, employing key-based authentication. Regularly updating your Raspberry Pi's operating system and software is also crucial to patch any potential vulnerabilities.
Setting up your Raspberry Pi with a static IP address is a foundational step, and the benefits are numerous. A static IP ensures that your device's address remains consistent, making it much easier to connect remotely. This contrasts with a dynamic IP, which can change periodically, requiring you to constantly update your connection details. Setting up a static IP is a relatively straightforward process, usually involving configuring your router or directly within the Raspberry Pi's network settings. Detailed instructions for this configuration can be found online, tailored to your specific network environment. It ensures your Raspberry Pi has a fixed address, simplifying remote access.
The primary method of achieving remote SSH access to your Raspberry Pi involves a few key steps. The first is enabling the SSH service itself. This can be accomplished through the Raspberry Pi configuration tool, a graphical interface that simplifies the process. Alternatively, you can use the command line, which provides more control. Once SSH is enabled, you can attempt to connect from another device on your local network using an SSH client, such as PuTTY on Windows or the built-in SSH client on macOS and Linux. Simply enter your Raspberry Pi's IP address and username/password when prompted.
For access outside your local network, you'll need to configure your network for external connections. This generally involves setting up port forwarding on your router. Port forwarding allows you to direct incoming traffic on a specific port (usually port 22 for SSH) to your Raspberry Pi. The process varies depending on your router model, but generally involves accessing your router's configuration page via a web browser and navigating to the port forwarding settings. Once configured, you'll be able to connect to your Raspberry Pi from anywhere in the world, using your public IP address and the port number you specified. If you're unsure of your public IP address, you can easily find it by searching "what is my ip address" on a search engine.
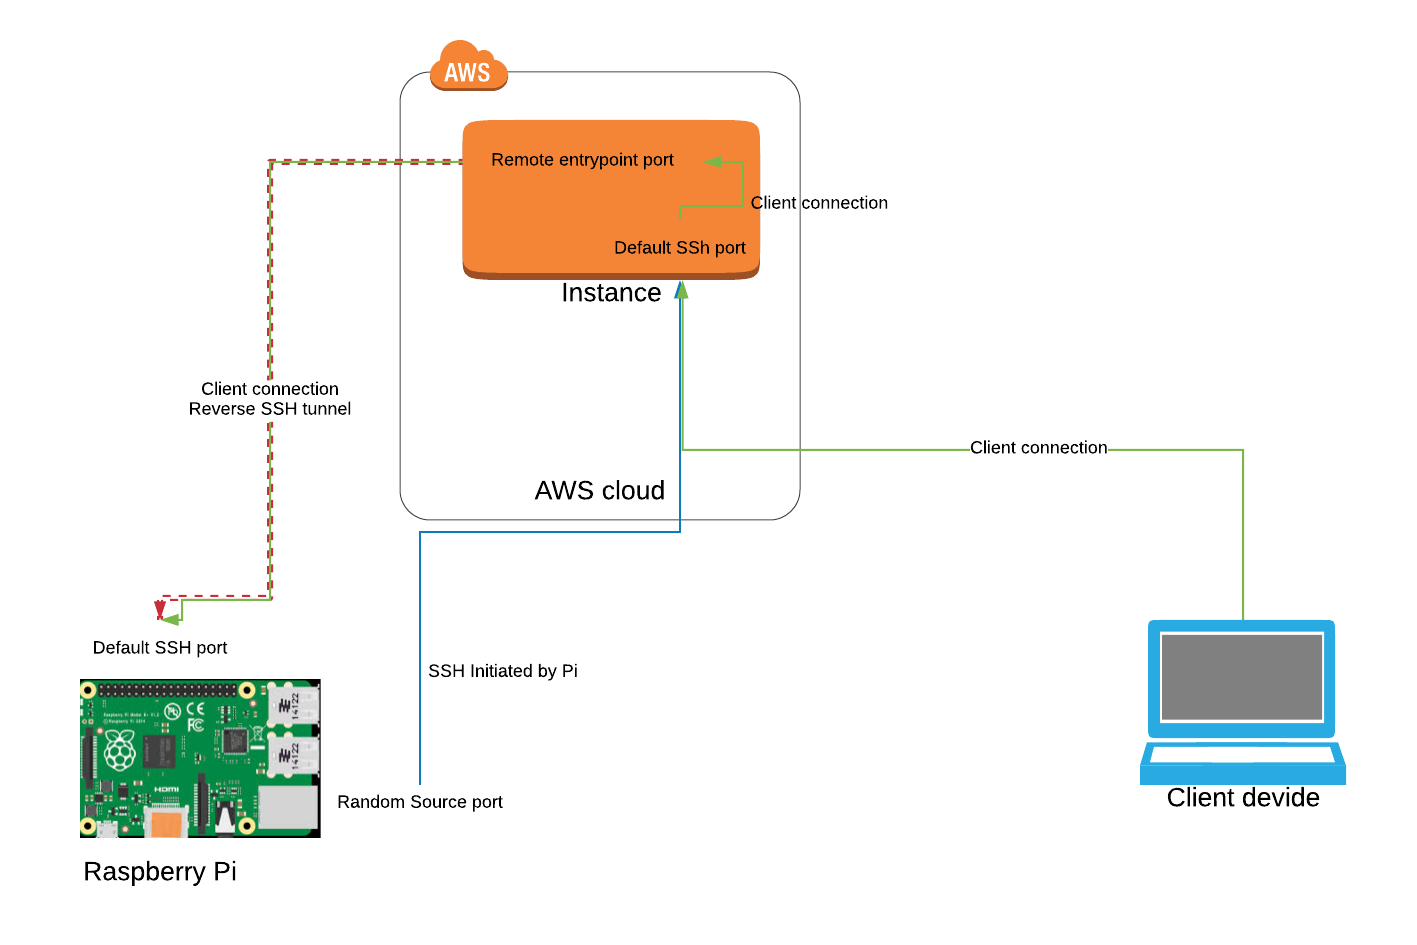
One of the more advanced techniques involves creating reverse SSH tunnels. This method provides a secure way to connect to your Raspberry Pi, especially when you're behind a firewall or a network that restricts incoming connections. With a reverse SSH tunnel, the Raspberry Pi initiates the connection to a remote server, allowing you to then connect to the Raspberry Pi through the server. This method can be particularly useful in situations where direct access to your Raspberry Pi is difficult or impossible.
Another avenue worth exploring is the use of tools like Tailscale. Tailscale utilizes a mesh VPN architecture, allowing you to create a secure and private network between your devices, regardless of their location. It simplifies the process of setting up remote access and eliminates the need for complicated network configurations like port forwarding. Tailscale offers a straightforward pricing structure with a free tier, making it accessible for most personal projects. It's a powerful tool that dramatically simplifies remote access, providing secure connections without complex network setups.
Another alternative involves the use of services like ngrok. Ngrok provides a secure tunnel to your Raspberry Pi, allowing you to expose your device to the internet without needing to configure port forwarding or manage a public IP address. This is particularly useful in environments where you don't have control over your router's settings or when you prefer a simpler setup process. You simply install the ngrok client on your Raspberry Pi and execute a command to create the tunnel. The tunnel status can be monitored, and once online, you can access your Raspberry Pi via the provided ngrok address. This is also extremely helpful in accessing your Raspberry Pi terminal.
When troubleshooting SSH connection issues, several factors can come into play. First, ensure that the SSH service is enabled on your Raspberry Pi and that it's running. Check your network configuration, paying close attention to the IP address and port settings. Verify that there are no firewall rules blocking SSH traffic, either on your Raspberry Pi or on your network. If you're using port forwarding, double-check the router configuration to ensure the settings are accurate. Finally, consider verifying the connectivity by pinging your Raspberry Pi from the remote machine. If you're still facing problems, consulting online forums or Raspberry Pi communities can often provide helpful solutions and troubleshooting tips.
The choice of methods to remotely access your Raspberry Pi will likely depend on your specific needs, technical proficiency, and security concerns. For basic access within your network, enabling SSH and using an SSH client may be sufficient. For access from outside your network, port forwarding, reverse SSH tunnels, or services like Tailscale and ngrok offer more robust solutions. Remember that the best approach is often a balance between ease of setup, security, and overall functionality. With the right tools and a bit of patience, you can unlock the full potential of your Raspberry Pi and enjoy secure remote access from anywhere in the world.
For the practical implementation, let's go over a few specific examples. To enable SSH via the command line, after logging into your Pi, use the command: `sudo systemctl enable ssh` and `sudo systemctl start ssh`. To connect via SSH, use: `ssh pi@`. Replace "" with your Raspberry Pi's actual IP address. If using a hosted server with a reverse tunnel, then use a command such as: `ssh -f -n -R 10000:localhost:22 username@ip_address_of_your_hosted_sever`. The command enables the reverse SSH tunnel. Cloudflared, mentioned earlier, requires installation on your Raspberry Pi, then follow the setup wizard to configure a connector type, often requiring authentication and tunnel setup.
For those wanting to access the terminal of your Raspberry Pi from a remote location via PuTTY, you can use a tool like ngrok. The basic steps include downloading and installing ngrok on your Pi, and then from your Pi's terminal, run a command such as: `./ngrok tcp 22`. Note the host address and port number provided by ngrok to access your Pi terminal via PuTTY from any location.
As a side note, a static IP is useful because it ensures a constant address, which is vital when setting up port forwarding on your router, reverse tunnels, or using other external access methods. The benefit is that you will always know the address of your Pi, which will be necessary for a variety of setups, including external access.
The Raspberry Pi configuration tool, built into the Raspberry Pi OS, is a great starting point for enabling SSH. You can do this from the graphical interface without touching the command line. Once enabled, use a program like PuTTY to connect from a remote network. The steps are clearly outlined on the screen when you use this tool.
With the information presented here, it should be possible to unlock the world of remote access, granting you complete control and convenience. Its a journey of learning and exploration, and the benefits are immense. So take the first step, and start experimenting. You'll find that the combination of a Raspberry Pi and SSH, or the other methods mentioned, creates a powerful tool that is limited only by your imagination.
The beauty of the Raspberry Pi lies not only in its compact size and affordability but also in its adaptability. By mastering SSH and other remote access methods, you're not just gaining the ability to manage your device remotely; you're also equipping yourself with valuable technical skills. Whether you're a seasoned tech enthusiast or a curious beginner, the world of remote access offers exciting opportunities for exploration and innovation.
If you are facing issues, there are a number of online resources and forums where you can find help. There are a lot of communities and resources. Online forums provide a wealth of information and support for Raspberry Pi users of all levels. They offer solutions to common problems and insights into more advanced topics. Websites and blogs dedicated to Raspberry Pi projects are great for exploring different use cases and learning about new technologies. Experimenting and learning from others is a great way to grow your skills.
Ultimately, the ability to access your Raspberry Pi remotely is a testament to the power of open-source technology and the ingenuity of the community. It empowers you to do more with your device and to integrate it seamlessly into your digital life. The journey of setting up remote access is a rewarding one, full of learning opportunities and practical benefits. By following the guidelines outlined in this article, you can successfully enable SSH and open up a new world of possibilities for your Raspberry Pi.
![ssh into raspberry pi from anywhere [3 easy steps]](https://tunnelin.com/wp-content/uploads/2020/06/raspberry_pi_ssh-768x576.png)